Adventures in Windows Media on the Mac
I’ve written about media codecs before. In fact, almost a year ago to the day I wrote about Apple’s then new H.264 implementation in QuickTime. I took a break from video shooting and editing in the past six months because my Canon GL2 DV camera’s firewire port broke as you may recall from recent posts.
On the way home from work, I was trying to get some recent video footage onto my PDA. I have a PocketPC device running Windows Mobile 2003 Second Edition.
This device can shoot video with the built-in camera and that video is encoded with the MPEG-4 codec. I figure MPEG-4 is a good place to start. Unfortunately video files I created using the MPEG-4 codec did not play on my device. The “Album” application would not even show them. Believe me, I tried every bit rate I could think of, every combination of audio settings, frame rate, key frames, and resolution. Nada.
By the way, I was transferring all of the filers via Bluetooth which seemed pretty peppy and more t han adequate for the 1–2MB files I was transferring.
Oh, yeh, back to my story. I was unsuccessful on the train so I came home and pouted. Internally, of course, externally I had to get ready for our new addition coming tomorrow night. Ah, I’m so distracted.
Focus!
So, I figure I would look into a way to encode WMV files on my Mac. I Googled for it and viola! Microsoft has a solution called Flip4Mac. It’s a set of codecs for QuickTime allowing OS X to encode WMV and play WMV within QuickTime itself. This is exactly what I needed!
 Strangely, although the Flip4Mac WMV components are a free download from Microsoft a company called Telestream, Inc. developed it and sells a Pro version. The Pro version seems to allow IMPORT of WMV files into QuickTime so you can export to QuickTime native. I don’t need that conversion so the free version is fine for me!
(You’ll see how silly I am when you read on below.)
The WMV Compressor
The compressor itself is well-integrated into QuickTime. It showed up as a simple conversion like any other:

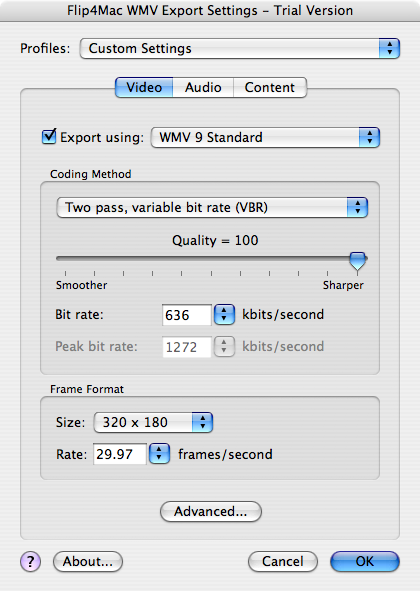
The options panel was very detailed and provided a lot of versatility. You can choose between WMV 9 Standard and Advanced. You are warned that videos encoded with “Advanced” won’t play on the Mac and they don’t (I tried). They also don’t play on my Pocket PC so I stuck with the “Standard” codec.
The rest of the settings, variable bit rate, full quality, 636kbits/second, a wide 320x180 aspect, and a full 29.97 frames per second rounded up the rest of the options. I tried many other encoding presets and bit rates and these settings seemed to work. So I tried them:
The export procedure took a few minutes.

The only problem is that the colors on the video spoiled after 10–12 seconds. The screen got a green tinge that only got worse.
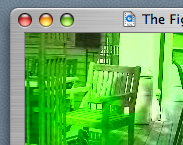
I tried the advanced dialog and inserted key frames every 1.0 seconds instead of the default of 5. Still, the video soon turned greener like a Martian.
Perhaps the “2–pass” VBR algorithm was crap. So, I switched to the single pass algorithm. Encoding was much quicker. Sure enough, that was the problem. The flip4mac web site says there is an issue with the 2–pass VBR algorithm. Who would have thought that second pass was there just to add green to your movie.
The resulting file looked great on my PocketPC! But it was 23MB! That’s too big. Plus, the video wasn’t anti-aliased properly. The video almost looked like it was interlaced. My source video was 1080i, which is 1920x1080 pixels and interlaced. Still, all of those artifacts should go away at 320x180.
I moved the quality slider from 100 to 80. Perhaps I was too ambitious at 100. The results were pretty dramatic. The file size was a mere 3.8MB which was perfect. However, I still saw interlacing artifacts. I thought setting the “Input Type” to “Interlaced – Upper Field First” in this dialog:
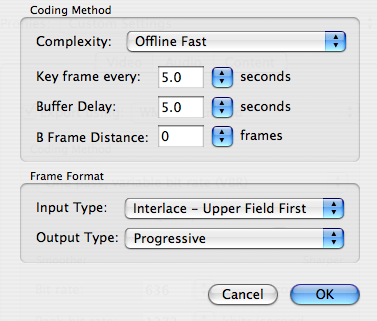
However, that did nothing. I then tried to force the source video to “display” non-interlaced by going to movie properties, and setting the “Single Field” and “De-interlace” check boxes. Now, these seem like “display preferences” and not settings which would affect the encoding. Just one more minute and I’ll find out…
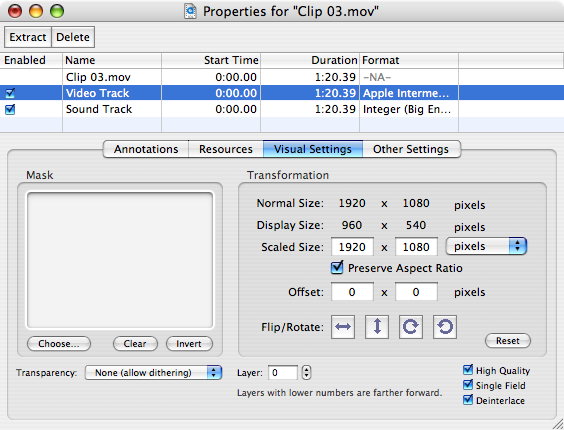
That seemed to work. I didn’t see any quick-motion interlacing artifacts. However, the edges of objects still seem to contrasty, almost as if the down-sampling is a nearest-neighbor algorithm instead of a pixel average. At this point, I’ve exhausted all of my options. How can I get the video to look better?
Just when you thought I was almost there; things get worse.
The next problem I encountered was that the encoder was stopping at 30 seconds! It looks like the “free” version is really a “trial” version. There are like 4 upgrades, from $29 to $179 and I have no idea which one would best suit me. I think I’ll need to enter a support call at some point since the feature lists for each version are too vague for me to make a decision.
And so ends a night of fun and excitement.
Comments
Nice details of the scenario. I like Telestream, and Flip4Mac....ring 'em up and you should get satisfactory answers..their support has been great for me.
Posted by: Antonio | August 7, 2006 11:29 AM