Journeymaps
You’ll have to categorize this post as uber-geeky. If you can’t handle an extreme level of geekiness, I suggest you cut out now.
So, this post concerns my D&D campaign, which isn’t running yet but for which I’m now preparing for a possible January ‘06 start time. Over the past few weeks and months, I’ve been working with the players to create the origins of their characters. Like any good novel, I see the development of the characters in the story as a key element to an engaging story. A significant part of a character’s makeup is their origin. This defines how they were raised, what traumas they endured, and can explain a lot about their behavior as the story unfolds.
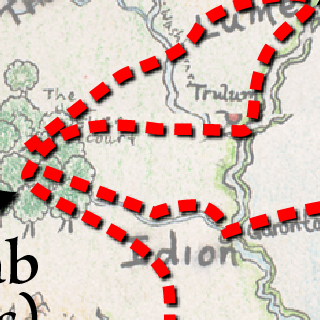
Writing the origins has been easy for some, but more challenging for others. One of the complaints that my characters have been bringing up is their inability to visualize where they have been in the world I’ve created. In addition, there are some major current events (like large-scale natural and unnatural disasters) that they need to incorporate in their narrative. To help with this, I spent a few hours tonight creating something I’ll call for now a Journeymap. A Journeymap is a map of my world overlayed with a red path which maps the places a character has been from birth to the present. Here is a sample journeymap:

I have a few more uploaded to these wiki pages:
http://www.primordia.com/cgi-bin/moin.cgi/Timeon
http://www.primordia.com/cgi-bin/moin.cgi/NicolinaAmakiir
http://www.primordia.com/cgi-bin/moin.cgi/AlluraBritelace
Creating the Journeymaps
I thought I’d spend a moment discussing how I created these Journeymaps and how I’ll maintain them. All of the maps are generated from a single Adobe Illustrator file. The file has this layer structure:
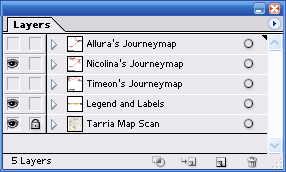
The base layer called “Tarria Map Scan” is the scan of my worldmap. My source scan is enormous, 14 in. by 16 in at 300dpi. I didn’t need that much pixel data in this layer so I rez’d down to about a quarter those pixels (8 in by 8in at 300dpi). This gives me clear image data when I generate a 1024 pixel wide final image which is what I felt was a good size.
I also made the map layer 50% transparent which mixes with the white background so the lifepath and text would clearly show over the hand-drawn map.
The next layer is the “Legends and Labels” layer. This is what you see at the bottom.
The next layers contain all of the lifepath information for each character. When I generate a Journeymap for the website, I only reveal one of these layers during the “Save for Web…” process.
This method affords me a few advantages:
- I save disk space over having a separate Illustrator file for each Journeymap.
- I can optimize the appearance of the scan (say adjust the translucency) or update the legend once and not have to repeat these adjustments in each file.
There are a few other subtletes in the map, which I’ll point out. The red paths have a slight drop-shadow to help increase contrast.
I also did my best to incorporate the glass button into the map. This is just a work in progress, but you can see the result below. The actual compass rose is kind of lame and is merely a placeholder. I hope to get some time to make a very nice looking map compass rose overlayed on that nice blue jewel ;-)
